
What you will need:
- Paint
- Erm, that's it...
Step 1:
- Open Paint by clicking on 'All Programs' > 'Accessories'
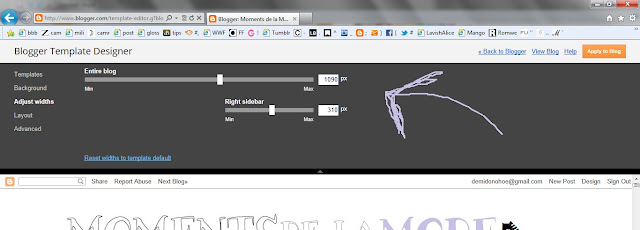
- Change the size of your Paint canvas to the size you want your header to be. My current header's size is 1015 (width) x 160 (height) pixels. If your header turns out to be too wide/not wide enough for the size of your blog, you can change he widths of your blog layout by going to 'Layout' > 'Template Designer' > 'Adjust Widths'. Slide along the bars until it's all Even Stevens.
- I have the newest version of Paint, I don't know if you'll want to download it or something but according to Google, if you have the oldest version go to 'Image' > 'Attributes' > ' Change Dimensions' to resize your canvas. (If you have this version of Paint and I am wrong, please let me know!)
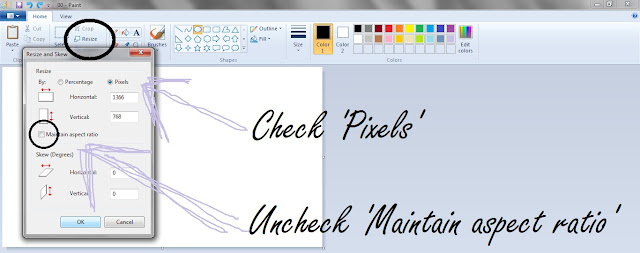
- For the most recent version of Paint, click on 'Resize' (as circled at the top) and choose the height and width you want, if it's not right straight away keep changing until the size of the canvas is the size you want your header. Make sure you pick 'Pixels' and not 'Percentages', and also uncheck the 'Maintain aspect ratio' box before you enter your numbers.
- For the most recent version of Paint, click on 'Resize' (as circled at the top) and choose the height and width you want, if it's not right straight away keep changing until the size of the canvas is the size you want your header. Make sure you pick 'Pixels' and not 'Percentages', and also uncheck the 'Maintain aspect ratio' box before you enter your numbers.
- I wouldn't go too big. I prefer smaller headers so you can see at least the title and the top of your picture in your first post. This way people will know a bit more about what kind of blog you have. Don't make a header so big it takes up your whole page. Alternatively you could actually include what type of blog you have IN your header. For example, for my title I would have 'Moments de la Mode' in big letters, and then in smaller letters 'A personal style & fashion blog' underneath it.
Step 2:
- Your computer fonts probably don't tickle your fancy. If you want a more exciting font, use DAFONT.COM to find thousands of cool, free fonts.
- It has instructions on the front page on how to install a font depending on which computer you have (Vista, Mac, etc). I have Windows 7 so to install a font I find one and click 'Download' > 'Open' > Drag the font file onto your desktop > Then drag that onto your 'Installed fonts' ('Control Panel' > 'Fonts'). If you're still now sure how to unzip and install a font file there are lots of simple tutorials on Google.
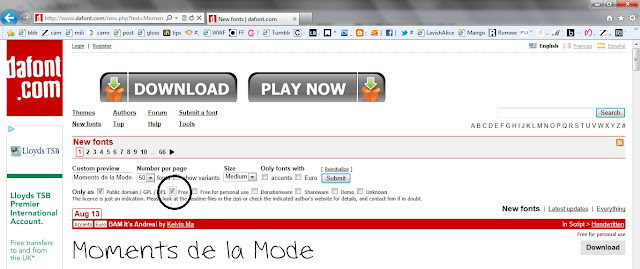
- I always put my blog title name in the 'Custom Preview' box so I can actually see what my blog title will look like. Make sure you click on 'More options' when doing this so you can check the 'Free' box (as circled), this way only free fonts will show up. A lot of fonts are only 'free for personal use', if you use these it'll probably be going against some copyright laws or something. Naughty naughty.
- After you have installed your font to your computer, type your blog title into Paint and then select your chosen font (if it doesn't show up, try closing Paint and then starting it up again). After you've done save it (I save mine as a JPEG file).
Step 3:
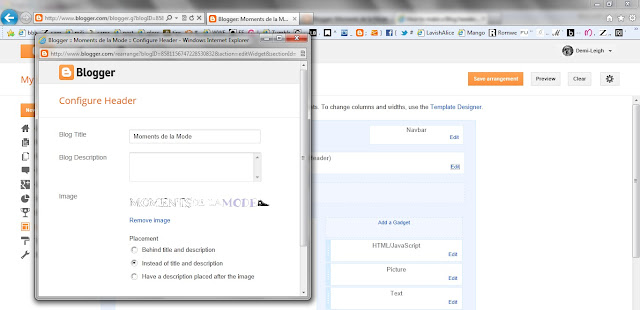
- Upload your new header to Blogger. Go to 'Layout' > Edit header' > 'Upload image' (or remove if you already have one). Make sure you uncheck the box under 'Placement' which says 'Instead of title and description'.
- If you want your header in the centre of blog, which most people do, then you might need to insert a HTML code. Don't worry if you're not a HTML whiz! As I said in the chat last night, you don't need to be one to have a nice looking layout. Your header might already be centred, but if not go to 'Template designer' > 'Advanced CSS' > Scroll to the bottom and click 'Add CSS' > Copy this little HTML code into the box:
.Header {
text-align: center;
}
The click 'Apply to blog'.
If this doesn't work for any reason I'd suggest searching Google for a code, there will be one somewhere!
And there you have it! I hope this helps you, if you have any more questions please leave a comment and I'll get back to you as soon as I can.
This is a great tutorial, thanks!
ReplyDeletexo
notafashionstudent.com
Yay :) I did it! (and a bit of tweaking so I have pictures too) thank you :) x
ReplyDeleteYay! It looks awesome! You're welcome.
Delete